Add multiple colors so you can compare & fall in love with a paint color for your project!
Include prepaid return label
Loading...
I Want To Keep The Samples- No Return Needed
How Sample Returns Work
When toggled on, a prepaid USPS Ground Advantage return label ships with your samples. If you want store credit, just place the samples back in the original packaging, apply the return label, and ship them back. As long as samples arrive in perfect condition, you'll receive store credit for the full purchase amount. No label needed? Just toggle off.
★ 2k Topcoats are required for durability & finish
$34.99
2K HS Clearcoat Spray Can - Gloss
-
0
+
$39.99
2K HS Clearcoat Spray Can - Matte
-
0
+
Review & Confirm Your Selections
★ Add Bundle To Cart When Finished Adding Prep Materials
🎨Your Paint Kit
Add $150.00 more for FREE shipping to the lower 48!
OPTIONAL:Masking & Prep Materials
1
Color
2
Groundcoats
3
2k Top Coat
4
Confirm
What are you painting ?
Select the Finish
Review & Confirm Your Selections
Kit Components
OPTIONAL:Masking & Prep Materials
1
Choose Kit
2
Select the Finish
3
Confirm
Description
Fever Dream Spray Can
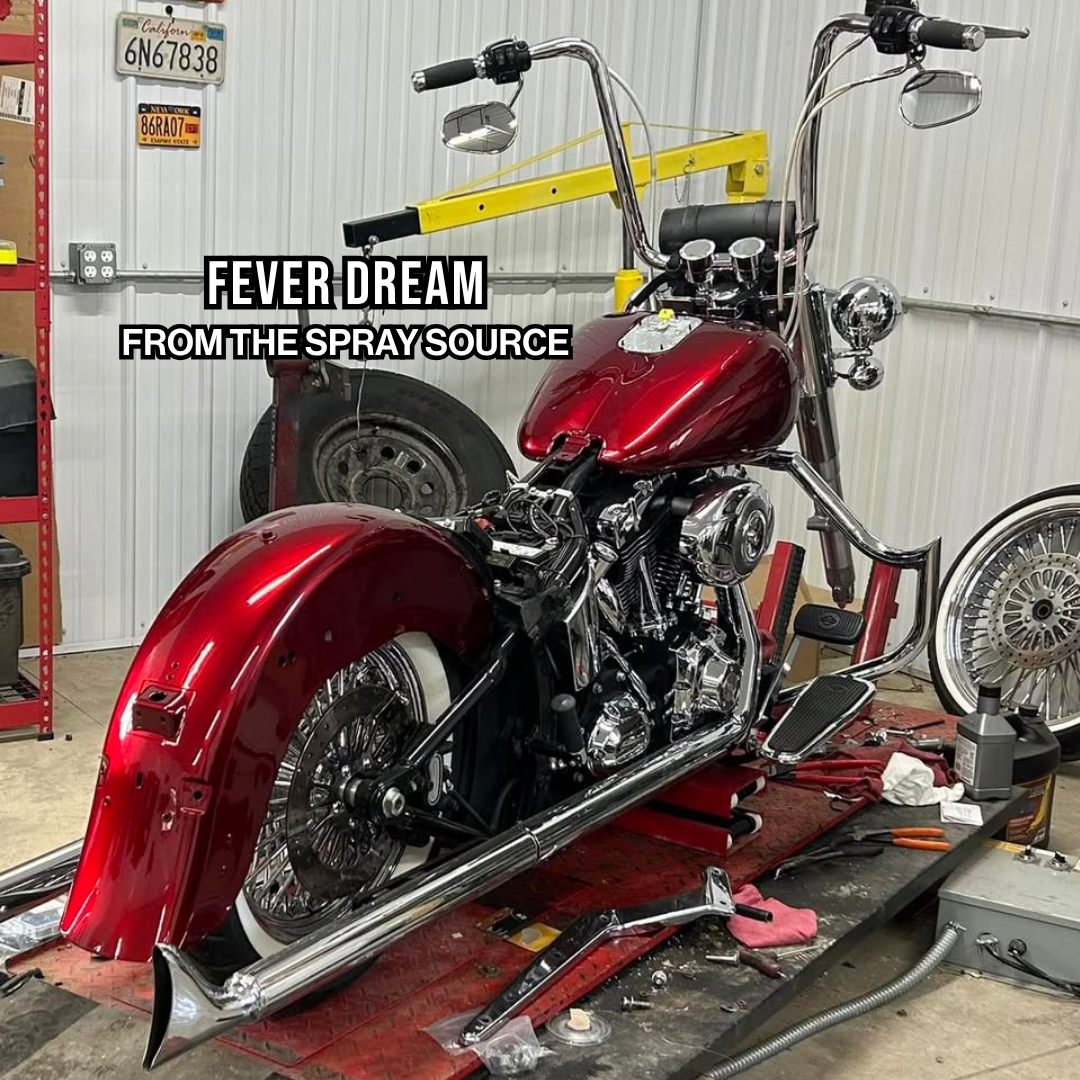
is an epic Alpha Custom Color with the best aspects of the 3 best paint types.. Pearl, candy, and traditional Basecoat! Great coverage but with the look of a candy 🔥
This color is best over a black sealer as shown on the speedshape in photos.
Your favorite pigments now in a spray can! Pre mixed and reduced, just shake it up and spray it over sealer or a properly prepped surface!
Best over a Black Basecoat ( if you need surface filling , Use Epoxy Primer & Sealer Spray Can 1k or sanded high build primer spray cans!)
This is a 1k basecoat and needs to be sprayed over the recommended Epoxy Sealer & topped with 2k HS Spray Can Clearcoat or any other 2k clearcoat.* These are Basecoat Midcoats ( 1k Midcoats ) Where the basecoat REALLY matters. We highly recommend sticking the basecoats we suggest above for best results. *
Application & Prep
STEP 1 – CLEAN THE SURFACE
1 - Wash with soap and water, rinse, and dry completely.
2 - Degrease using wax and grease remover or isopropyl alcohol.
3 - Wipe dry with a clean, lint-free towel.
STEP 2 – SCUFF / SAND FOR ADHESION
If Raw Plastic / Polyurethane: Evenly scuff bare plastic or raw surfaces. These will also need to be adhesion promoted prior to paint using our WolfBite Adhesion promoter.
If Good Condition OEM Paint: Sand smooth or glossy paint with P320-P400 grit sand paper or Scuff Pad until uniformly dull with no glossy areas.
If Surface Needs Bodywork or heavy scratches removed: Sand the damaged areas with 180 grit (feathered out into the panel) then do your bodywork. Finish in 220 Grit sanding. Then spot prime with high build primer - fading the primer out into the rest of the sanded panel covering the bodywork and any 220 grit scratches. (the good condition areas of the panel should have been sanded in 320-400 or scuff pad). Lastly, after the high build primer is dry and ready to be sanded (check tds for timeline), sand with 320-400 to match the rest of the panel.
After The above prep: Remove dust with compressed air or a clean microfiber towel.
STEP 3 – FINAL WIPE & TACK
1 - Wipe the surface again with isopropyl alcohol or wax and grease remover.
2 - Allow solvents to fully evaporate.
3 - Lightly wipe with a tack cloth immediately before spraying. Do not press hard. (optional but great step)
STEP 4 – SET UP YOUR SPRAY AREA
1 - Use a well-ventilated, well-lit area with good extraction fans
2 - Ideal conditions are 65–75°F (18–24°C) with 40–60% relative humidity.
3 - Keep the area free of open flames, sparks, or ignition sources.
4 - Wet the floor if your space allows to keep dust down
5 - Cover any items or areas in your space that you do not want to get overspray on
STEP 5 – PERSONAL PROTECTION
1 - Wear a respirator rated for organic or solvent vapors.
2 - Use nitrile gloves and safety goggles.
3 - Wear a paint suit
STEP 6 – SHAKE THE CAN
1 - Shake vigorously for 45–60 seconds.
2 - Invert the can several times while shaking to fully mix pigments and metallics.
STEP 7 – TEST SPRAY
ALWAYS DO A TEST SPRAY + SPRAY OUT CARD IF DOING OEM SPOT JOBS
1 - Spray on cardboard or a scrap panel.
2 - Confirm even spray pattern, correct color, and proper atomization.
3 - Adjust the spray can's nozzle to match your spray style or surface.
4 - If the can is not operating correctly, remove the cap completely, reseat it on the can, and twise the entire nozzle 360 degrees. Since our cans are made to order, sometimes there is slight paint build up and reseating the nozzle corrects this.
STEP 8 – SPRAYING TECHNIQUE
1 - Hold the can 5–6 inches from the surface.
2 - Keep the can perpendicular, 90 degrees to the panel at all times.
3 - Move at a steady speed using smooth, even passes. You are looking for medium wet coats NOT super wet, pooling coats.
4 - Overlap each pass by 50 percent.
STEP 9 – TRIGGER CONTROL
1 - Begin moving before pulling the trigger. Start off of the panel then move onto the panel. This avoids build up on edges.
2 - Fully depress the trigger while spraying.
3 - Release the trigger completely at the end of each pass.
4 - Stop spraying after clearing the panel edge by an inch.
STEP 10 – COATS & FLASH TIMES
1k Primer/Sealer
1 - Spray a medium wet coat on the entire panel (if not blending oem paint) to achieve a 75% coverage. This fills in the sanding scratches as well as gives a uniform , required ground coat color for the next steps.
2- Allow to flash dry for 5-15 minutes. Time depends on the product and environment.
3 - Apply the second medium-wet coat to achieve full coverage
4 - Allow to dry for 30 minutes or until the wet look fades so a dull, even finish and is completely dry to the touch.
GROUNDCOATS or SOLID COLORS (BEFORE MIDCOATS IF APPLICABLE)
This is for our Base Black, OEM Undercoats or solid colored basecoats. Not all projects require this step.
1 - Apply the first medium-wet coat at approximately 75 percent coverage.
2 - Allow to flash 5-15 minutes or until the wet look fades so a dull, even finish. Time depends on the product and environment.
3 - Apply the second medium-wet coat to achieve full coverage
4 - Allow to flash 5-15 minutes or until the wet look fades so a dull, even finish. Time depends on the product and environment.
5 - Apply a Third medium wet coat if the color is not 100% covered and even at this point. This will vary based on the color and product being sprayed.
4 - Flash another 15-30 minutes. Until the surface is even, dull, an dry to the touch.
MIDCOAT , CUSTOM COLORS , OR METALLIC/ PEARL OEM
This is for coverage over required groundcoats , not "ghost effect"
1 - Apply medium coats over the required groundcoat for your color.
2 - Flash 5–15 minutes between coats or until tack-free.
3 - Apply additional coats until the desired color depth is achieved. Most custom and oem colors require 2-4 medium coats - check color description or compare to existing oem panels
4 - Apply 1 light "control" coat to make sure all of the pearl or metallic is even and not splotchy or "tiger striped"
5 - Wait 30 mins or 15 mins after the surface is completely dull and dry to the touch before moving on to topcoat step.
EFFECT PEARL / COLORSHIFT COAT
This is for effect over light groundcoats (not for coverage)
1 - Apply one light effect coat at approximately 25 percent coverage.
2 - Allow 5-15mins for the coat to flash before adding another light coat (if you want to add more effect)
Repeat as many times to your preference of effect and coverage.
3 - Wait 30 mins or 15 mins after the surface is completely dull and dry to the touch before moving on to topcoat step.
STEP 11 – CLEANUP & STORAGE
CAP CLEARING
1 - Turn the can upside down after spraying.
2 - Spray until only clear propellant comes out.
3 - This clears paint from the valve and prevents clogging.
NOZZLE CARE
1 - Remove the spray nozzle after use.
2 - Wipe clean with solvent.
3 - Do not soak the nozzle in solvent.
STORAGE
1 - Store cans upright in a cool, dry place.
2 - Keep away from direct sunlight.
3 - Avoid freezing conditions.
4 - Do not store above 120°F (49°C).
QUICK TROUBLESHOOTING
1 - Dry or rough texture means the can is too far away or moving too fast.
2 - Runs or sags mean the can is too close or moving too slowly.
3 - Continue to shake and agitate the can between coats- Repeat step 6
4 - If ever unsure the color is 100% covered (and you are going for coverage) - one extra coat is always a good idea.
Frequent Questions
Do I Need Sealer Or Groundcoat?
YES! All of our basecoat spray cans require a specific colored groundcoat for proper hue and coverage. Sealer is HIGHLY recommended for adhesion, surfacing, and is many times REQUIRED based on the basecoat color or projects condition.
Do I Need Clearcoat?
YES! All of our basecoat spray cans REQUIRE 2k clearcoat sprayed on top of them. This not only gives the final finish (gloss or matte) but also provides durability and UV resistance.
What sandpaper grit can I spray this over?
If you are not spraying it over our epoxy sealer you will need to sand with either 600 grit or a gray scuff pad.
Can I use this to paint chrome?
Yes but it will require more prep - On chrome you will want to sand it with 180 grit , clean, spray adhesion promoter, then epoxy high build primer. Then sand the epoxy primer with 320, seal, then paint.
Can you paint your calipers with this paint?
Yes - our paints work great on calipers, engine blocks, and valve covers!
How to keep the spray can after using some and will use the rest in the next couple of days/weeks? Will it still be in good to use?
Yes. Before putting on shelf, turn upside down and spray to clear the nozzle.
Do I Need High Build Primer?
If you are painting over bodywork, uneven surfaces, failed clearcoat, or anything not in perfect condition : YES! High build will cover and help even out the surface and provide you "filling" that can be block sanded smooth before sealer and paint.
The guitar paint kit was great, but I do have a few suggestions. The guitar body still needed to be sprayed with a separate sealer as the primer wasn't enough on its own. Additionally, the clear coat orange peeled quite heavily and required additional sanding. I'd recommend a second can of clear coat for larger guitar bodies. All that said, the paint sprayed very well and the color is amazing. I will buy again but add that extra can of clear coat. :)
Kristen S.5/5Verified
Fever dream with summit white stripes. Pics dont do it justice! Everything came in a timely manner and the paint turned out great
Dustin E.5/5
Great color looks amazing lays flat.
Wesly S.5/5Verified
.
Rich M.5/5Verified
Picture is what's currently on my bench. TSS Fever Dream with Scorched Apple Sides, and a hidden surprise. Clear Coat after cleanup. I love TSS Products in Spray Cans. The Paints lay down like glass. I can build anything, but I could never paint, until I found these guys. The support in Next Level. I would hesitate to ask a question, thinking it Silly, Nope, the answer would start gentle, and become a Masterclass Education. Hight Quality Paints, Step by Step Process, Fast Shipping, Fantastic Pot Life, and all at an Amazing Price!
Jay G.5/5Verified
It was definitely fun to use. It’s like anodizing but for paint.
Russell M.5/5Verified
All the sample i chose looked great. I’m stuck between Fever Dream and Crimson Orange.
Chris A.5/5Verified
You guys are wonderful to work with your paint is phenomenal and easy to spray
John Danneker B.5/5Verified
The paint is excellent quality easy to spray and I would recommend it to anyone !!!
Eric H.5/5Verified
This was my first complete paint job, Fever Dream and Luxor Black. Bought a complete paint kit and couldn't be happier.
Aaron M.5/5
While planning a project cars final color I fell in love with the Phantom Red from "The Spray Source". Not one to be satisfied with a small pre painted form to judge the color, I ordered a 4 ounce sample. While on the site ordering I saw the Fever Dream which appeared to be a candy apple type of color and threw a 4 ounce bottle of that in the cart and hit the purchase button.
The paint samples arrived in a timely fashion and I sanded and coated a hood with some black primer. Splitting the hood into 2 halves I hit one half with the Phantom and the other with the Fever both paints were ready to spray and laid down beautifully despite being sprayed in a dust filled workshop. I wasn't worried too much about trash as this was simply a color comparison. After a couple of coats of clear the results POPPED! Both colors are amazing! The project car, a 1967 Sunbeam Alpine will receive the Phantom Red but both colors are amazing!
Spray Source, you get an A+++ from this old hot rodder and I will be submitting an order for some Phantom Red before too long!
Keith R.5/5Verified
I will be definitely be buying more. Great colors and price.
John G.5/5Verified
Great shipping time even with the transition with the company under going .i was not expecting it to land as fast as it did great job guys ! Now on to the paint. my paint guy just shot a black base and shot 4 coats and a clear no buffing or really any other prep aside from my half a$$ priming. the ready to shoot laid down smooth ! I will be using tss for all my builds .
Ernest R.5/5Verified
Layes very nice, has great coverage. The shipment was damaged i contacted them, they sent me a replacement right away. Very impressed across the board! Will buy from them again.
Jim Y.5/5Verified
So glad to be able to buy these spray outs. Helped me make my choice for sure. I will be buying my choice real soon.
Troy P.5/5Verified
Closest I've found to what I'm looking for
Darren S.5/5Verified
Fast shipping came in a timely manner Thanks Tommy and crew !
Chris S.5/5Verified
Super quick shipping and wonderful quality. Definitely will be using them from now on.
Zachary S.5/5Verified
Looks amazing
Miguel S.5/5Verified
The Fever Dream sample I received is the one I like.
David D.5/5Verified
Seems a little darker than I thought. Glad I bought the sample
Robert C.5/5Verified
Everything arrived quickly. Part of the order was out of stock but quickly came in. Communication was great and all my questions were answered. Haven't painted the car yet but hoping it looks as good as the samples and goes on smoothly
Dustin E.5/5Verified
Good stuff. Makes color choice easy.
Steve K.5/5Verified
Great product fast shipping
Seth D.5/5Verified
Great
Ron P.5/5Verified
All good. Nice paint
Ron P.5/5Verified
Great paint layd smooth great coverage
Jim Y.5/5Verified
I like that 1. Complete Kit that’s Specifically curated for Guitars. Epoxy base/sealer, color coat, and clear. Oh, sandpaper, and masking tape too, everything!
2. Aerosol Cans that mix activated paints as you spray. Paints like Epoxy, High performance lacquers, Urethanes, and many more. 3. They know how much you need for Guitars, Motorcycles, and passenger vehicles. Everything is sized right. Fast shipping. 4. Not inexpensive because of low quality, it’s because there’s no waste.
Jay5/5Verified
Color is incredible along with customer service’s. Highly recommend will definitely be my go too paint source. This one of my color choices narrowed down to 3 I think. 😂
Jeff S.5/5Verified
Really like it, ordered it. Wanted a little more red but will see how it looks sprayed.
Brian S.5/5Verified
Bought the spray out car to help my 15 year old daughter figure out what red she wanted on her truck. The sample was beautiful before we went into the sun with it!! It absolutely made her decide in seconds that the color was her perfect red and we no longer had to look around. If you have kids then you know how hard it is to convince them of anything!! The sample was perfect and definitely worth the money and ordering!! Thanks for the assistance and I will be contacting you when it is time to start painting!!
Ian H.5/5Verified
Very nice color give it a look
Chad H.5/5Verified
Paint looked great on my spray out, was a beautiful color
Chris O.5/5Verified
Really a nice color.
Brian R.5/5Verified
Just did the spray out for the customer to approve. Hopefully they love it and we can get started on the project.
Jon B.5/5Verified
Have not had a chance to spray out yet but it looks fantastic from a swab from the container. fast shipping would buy from again with no worries.
Rodney S.5/5Verified
Great colors
Thank You
Terry D.5/5Verified
I ordered heatwave, molten, and fever dream. Fever wins by a landslide to me. I dropped the car off along your sample at the paint shop.
Stuart W.5/5Verified
I like the colors. I wanted to see them up close b4 i make my selection.
Stuart W.5/5Verified
Good stuff
Austin L.5/5
Choosing a selection results in a full page refresh.
Opens in a new window.
This is a "Tri-Stage" paint and requires the undercoat to be sprayed underneath it for a precise OEM match.
Change Reduction / Temperature?
Changing the reduction or temperature will reset your current bundle
selection.
Bundle components are generated based on these settings, so your selected products will be
cleared automatically.